 Services
How to Setup a Cloud VPS with MaxReseller (Step-by-Step Guide)
If you’re looking for reliable and scalable VPS hosting, MaxReseller is a top choice in the Indian hosting market. This guide walks you through how to log in, order a VPS plan, set up your server, and access the dashboard — all in just a few minutes.
🔐 Step 1: Log in to MaxReseller
To begin, visit the official MaxReseller Client Area:
🔗 https://maxreseller.com/clientarea/login
-
Enter your registered email address and password
-
Click Login
-
If you don’t have an account, click Create Account
☁️ Step 2: Access the Cloud VPS Page
After logging in:
-
Navigate to the Servers or VPS Hosting section on the dashboard
-
Click on Cloud VPS to view all available plans
📊 Step 3: Browse and Compare VPS Plans
Here, you’ll be able to compare key features:
-
CPU Cores
-
RAM
-
SSD Storage
-
Bandwidth
-
Pricing
-
Server Locations
Take your time to choose a VPS plan that suits your resource needs and budget.
🛒 Step 4: Select a Plan & Order
-
Click Order Now on the VPS plan of your choice
-
Configure any add-ons or extra features if required
-
Click Continue to Checkout
💳 Step 5: Complete the Payment
-
On the payment page, click Pay Now
-
Scan the QR code displayed on the screen using your mobile banking app
-
Complete the transaction
-
Wait for payment confirmation
Once completed, you will be redirected to the Client Area.
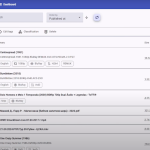
🧩 Step 6: Launch VPS Control Panel
-
From the dashboard, click Continue to Client Area
-
Go to Services > My Services
-
Click on your VPS Service Name
-
Then click Open Control Panel
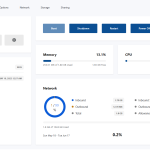
⚙️ Step 7: Server Setup
Now it’s time to configure your server:
-
Enter your Server Name
-
Set the Hostname
-
Choose the correct Timezone
-
Select the Operating System you prefer (Ubuntu, CentOS, etc.)
-
Optionally, add your SSH Key
-
For advanced settings, click Advanced Options
-
Once all settings are ready, click Install
⚠️ Please wait while the installation process completes. It might take a few minutes.
📬 Step 8: Receive Server Credentials
Once installation is 100% complete, you will receive an email containing:
-
Address: 103.xx.xx.230
- Port: xx
-
User: xxxx
-
Password: xxxxxxxxxxxxxxxxxxxxx
🖥️ Step 9: Access Server via SSH
After receiving your server credentials via email, you can access your VPS directly using SSH from your terminal.
📥 Open Your Terminal
If you’re using:
-
Windows: Open Command Prompt or PowerShell, or use an SSH client like PuTTY
-
macOS / Linux: Open your default Terminal app
🔐 Use the SSH Command
Replace the placeholders with your actual server details:
Terminal
- ssh username@your-server-ip -p port
For example:
Terminal
- ssh xxxx@103.xx.xx.230 -p xx
username: Typicallyrootfor VPS-
your-server-ip: The IP address provided in the email -
port: The SSH port (default is22, unless otherwise specified)
🔑 Enter Your Password
When prompted, paste the password from your welcome email. You won’t see it as you type — this is normal for security.
✅ Final Thoughts
Setting up your VPS on MaxReseller is quick, efficient, and beginner-friendly. Whether you’re launching a web app, hosting client sites, or managing development servers — their cloud infrastructure offers high reliability and support.